Friday, September 28, 2012

Sweet Saturday #22: Sweet Room Decor Idea

I believe this post will mark my first craft-related feature. Since having a toddler, we have been doing all kinds of arts and crafts projects, mainly very simple ones that involve crayons, paint, and pom-poms. At Target, they sell cheap little bags of crafty things in their $1 Spot section, and time to time I pick up a few things like pipe cleaners and recently these sparkly heart and flower-shaped foamies. At the time, I had no idea what we'd do with them, but then one day, inspiration struck...

For her last birthday, Lily got a bunch of Mickey Mouse Clubhouse flash cards. She basically just liked to take them out of the box and throw them all over wherever she was playing at the moment, leaving yours truly to clean them all up after she was through. They had become rather bent up, but still very cute and usable, and she just loves anything Disney, so I thought I could figure out something to create with the cards and the foamies...


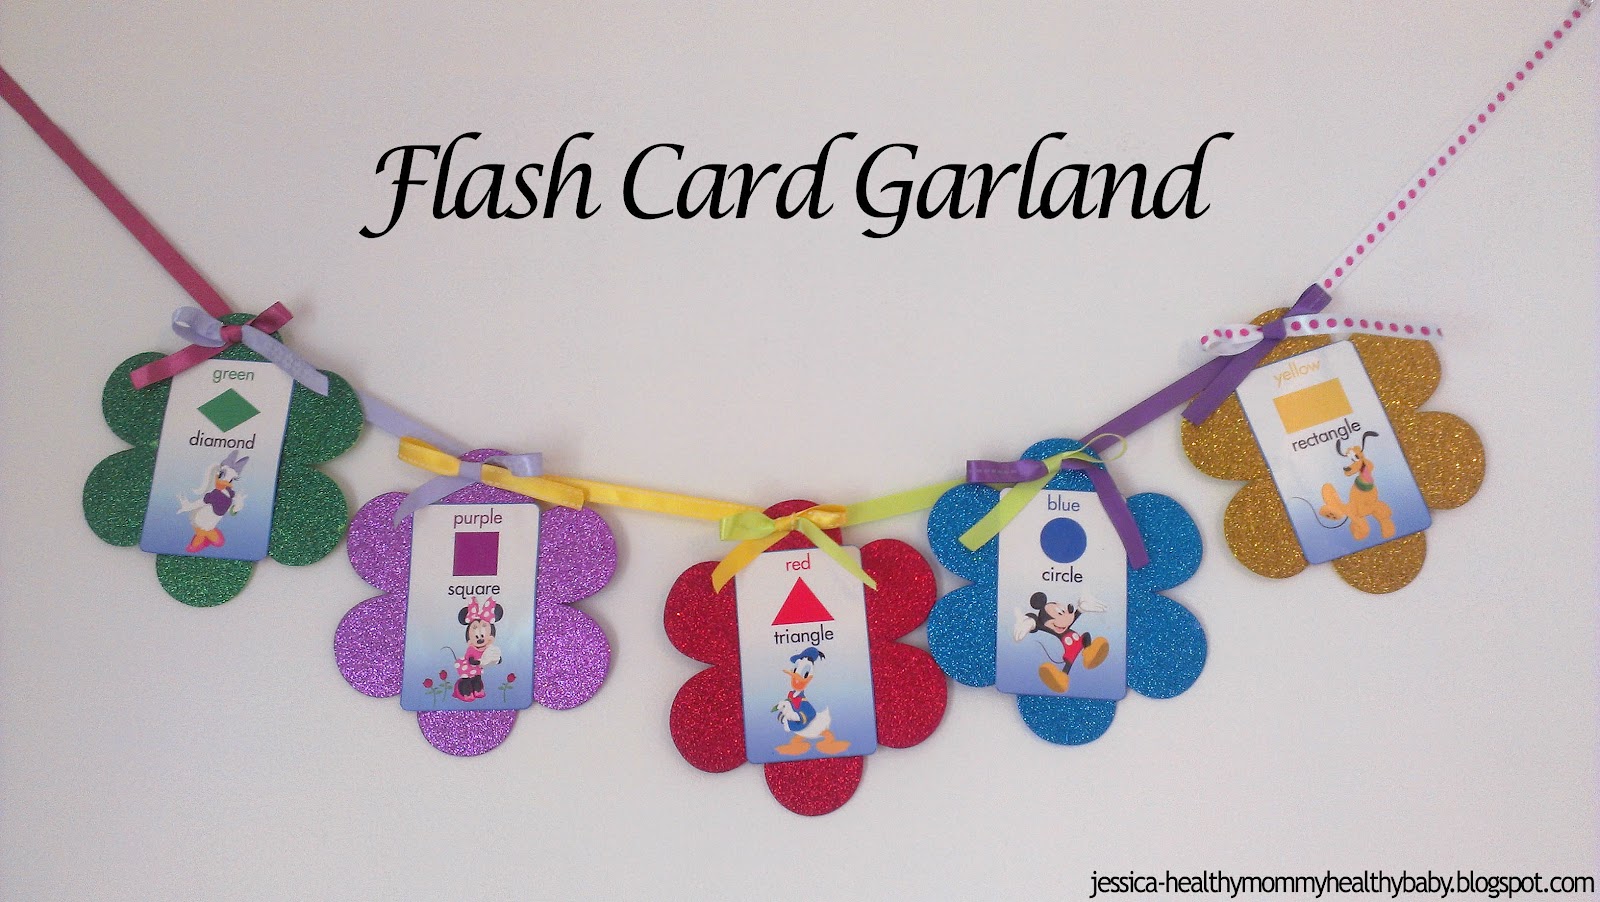
It was pretty simple. I cut the red boarders off...


Then glued each freshly border-less card onto the foamies.

 Next, I punched holes onto the tops, then used scrapbook ribbon to tie and link them together.


Ta-da!


I also got some heart-shaped ones. I gave them to Lily to see what she'd want to do with them, and she promptly pulled them onto the floor and enjoyed their sparkliness.


So simple! I also made one that hangs vertically against the wall. For that one, I merely glued the foamies directly onto a long piece of ribbon, then added a few sparkly pom-poms for embellishments.


You may think this is off-course for what I normally blog about, but I think using your brain for creative purpose strongly coincides with supporting total body health. Lily has been nothing but an inspiration to me for this part of my our creative development, and I am more than pleased by that :)

Lily is getting really good at learning her colors and shapes, so this garland also helps with that. The Disney characters don't hinder that at all either ;) I invite you to link-up any cute craft ideas you have today, especially if it's fall-related since it's that time of the year again! I just finished my fall wreath, which I may share on a later post.


Now on to the hop!!!

Our guest-hostess today is Christina from Mama's High Strung. She has a delightful blog full of tasty recipes and tidbits on all things food-related. Check her out and don't forget to follow! Leave her a comment so she can follow you back ;)

Just follow these simple rules:

1. Link up something sweet to really WOW us all- your blog, Etsy store, Pinterest, Facebook, whatever you want! 
2. Link-up as much as you want and please follow Mama's High Strung and me if you are not already. Leave me a comment if you are a new follower so I can follow you back!
3. Hop around and say hi. 
4. Share my button to get more people to join us (not required, but it would be nice!)


Healthy Mommy, Healthy Baby


Thanks for joining :) This link-up makes me look 
forward to Fridays all the more :) 


Wednesday, September 26, 2012

September's Up-and-Coming Blog of the Month!

This month's Up-and-Coming Blog of the Month is quite a clever one, the name alone should give you a clue: My Pinterest Reality. I first found Kimberly's blog via Simple Living's Foodie Friday recipe hop and here's the initial post that caught my attention: Accordion Potato Roast. Wow, right?! I think hers turned out better than the original pin...

Doesn't that look delicious?

Kimberly's mission is to literally make the things she pins on Pinterest "her reality". With each day and with each post, My Pinterest Reality shares with us a creative new pin- whether it be recipe, craft idea, DIY jewelry, kid's activity, or whatever captures her interest. 

Some more examples of fun posts you can find are this letter made of wine corks, this pretty wire and bead necklace, and this cute and easy to make jersey knit headband. The writing is done well, the layout is lovely, and the pics provide easy to follow visual instructions for each project.

MyPinterestReality

Stop by My Pinterest Reality- you won't be disappointed! It's a great idea for a blog, and one that I know must keep Kimberly busy :)


I have some blogs in mind for the next Up-and-Coming Blog of the Month, but if you would like to nominate one, please do so in the comments. The only requirements are that the blog has 200 or less GFC followers, is continuously updated, and has to do with parenting, health, crafts, cooking, and/or creativity.

Monday, September 24, 2012

Meatless Monday: Asparagus Baked Eggs with Golden Yukons

Asparagus may not be in season here in NJ, but after viewing this lovely recipe on Miki's Scrapbook (adorable blog, check her out!), I just had to try it! I paired this simply delicious and easy baked dish with some equally simple to make sauteed Yukon potatoes, and dinner was served! It was a big hit with the whole family, and I think yours would enjoy it as well :) Lily and Paul are not usually the biggest asparagus fans, but they both ate this up, and especially enjoyed the potatoes covered in crunchy, flavorful garlic.


Asparagus Baked Eggs with Golden Yukons
(serves 2-4)

For the asparagus:

12-20 asparagus spears, trimmed and rinsed
2 large eggs
1-2 tbsp bread crumbs (depending on how crusty you want it to be)
1-2 tbsp grated Parmessan cheese
Salt and pepper to taste
1 tbsp olive oil

Preheat oven to broil. Spread some of the olive oil onto bottom of ramekin or baking pan, then the rest onto the spears. Lay spears onto the ramekin or pan, then carefully crack eggs over top, keeping yolks in tact. Next, sprinkle the bread crumbs, cheese, salt, and pepper on top of that, then place in oven on center rack. Bake for about 10 minutes, or until eggs are set and topping is lightly browned. Serve right away, cracking the yolks if desired.


For the Yukons:

4 medium Yukon potatoes
3 cloves garlic, minced
1 medium Vidalia onion, diced
2 tbsp olive oil
Salt and pepper to taste

Cut the Yukons into quarters, and then slice into thin slices. Heat 1 tbsp of the olive oil in a medium pan over low heat. Add two-thirds of the garlic and onion to the pan and heat until fragrant. Raise heat to medium-low, the add the potato slices, layering them on top of garlic and onion. Drizzle remaining olive oil on top, and add the rest of the garlic and onion. Cook over low heat, stirring, for about 5 minutes, then cover. Cook for about 10 minutes until potatoes are tender, then uncover and cook, frying until slices are lightly browned. Serve alongside the asparagus baked eggs.


Clearly, I had way too much fun taking pictures of this beautiful dish

Although eggs are used, this is still a meat-free dish, albeit not animal product-free. Use cage-free, organic eggs to keep it in line with eating a diet bettering the environment for Meatless Monday. Also use organic Parmessan if you can find it! (organic everything for that matter).


Now it's your turn to share your Meatless Monday dish below! No rules, other than please only link-up meat-free recipes. No other un-related links or I will remove them. Sorry to sound so harsh, but let's keep it true to what it is, ok? Link up as much as you want, and feel free to spread the word with the button below. Thanks, and have a great week! 

Photobucket


Friday, September 21, 2012

Sweet Saturday #20: Raw Chocolate Banana Tart

For today's post, I'm sharing a really yummy recipe adapted from Good Girl Gone Green's blog. She always has such delicious recipes made with mostly (if not all) raw ingredients. You should definitely go check her out!

Anyway, when she linked this recipe up to Sweet Saturday last weekend, I just had to try it. I had most of the ingredients already, and what I didn't have, I improvised. I also had 2 ripe bananas needing to be used, so I tossed those in too. It came out phenomenal! The only thing I would do in the future is add some honey into the crust because I found it a little bland, but that's just me :) Other friends who tried it said they liked it just the way it was (yes, was, because this baby is gone!).


Raw Chocolate Banana Tart
(serves 8-12)

For crust:
1 cup nuts of your choice, such as almonds or pecans (I used a combination of almonds and cashews)
2 tbsp shelled hemp seeds
2 tbsp flax seed (I used some that were already ground)
1/2 cup coconut oil
1/3 cup shredded unsweetened coconut

For filling:
2 ripe bananas 
1/2 cup raw cacao or cocoa powder (I used cocoa)
1/4 cup honey, agave, or maple syrup 
1/4 cup coconut butter or oil (I used oil)

Note: If possible, soak nuts for up to 4 hours before using. I only soaked them for about half an hour, and everything turned out fine.  

Place nuts, coconut oil, and shredded coconut into food processor and blend until it is a fine crumble. Pour crumbs into a 8' or 10' pie pan and press into the bottom of the pan to form a layer, then place into freezer to set.


Looks like a beach...

Next, melt the coconut butter or oil if it is not melted already. You can keep things raw by melting it in a food dehydrator if you have one, or placing it in a small bowl in a larger bowl of warm water. Once melted, mix the ingredients for the filling together in the food processor, except for one of the bananas, until smooth.


Take the nutty crust out of the freezer, and spoon or pour chocolate banana mixture onto it, spreading it so that about an inch of the crust is still visible. Slice the reserved banana up and place slices on top of tart. Place in freezer until it sets, for about 1 hour (could very well take less, but an hour is for sure). Allow to defrost a bit before serving.


The one thing with placing the sliced banana on top is you have to keep the tart in the freezer once it's done, as to prevent them from getting all brown and gooey. If you'd rather keep it in the fridge so it doesn't take long to defrost (and easier to slice right away!), just don't put banana on top. It will still be beautiful and delicious!

Some other things you could use as toppings are:
  • sliced strawberries
  • blueberries
  • raspberries
  • sliced or crumbled nuts
  • shredded coconut
Just to name a few!

Eating raw helps to contain all natural enzymes present in food, which would be decreased or destroyed from cooking. These enzymes help our bodies to absorb the nutrients found in foods. Cooking food can also cause harmful compounds to form- especially if you burn or overcook something -that can be cancerous.  

In this day and age, it's difficult to go completely raw, but it's good to eat as much raw foods as possible, especially fruits, vegetables, and legumes. This tart will enable you to eat healthy and raw without having to lose the enjoyment of eating! Good Girl Gone Green has TONS of fantastic raw food recipes on her blog, as well as information about choosing a healthier raw lifestyle, so do take a look if you are curious about eating raw! 


OK- now it's time for the hop! Our guest-hostess today is April from April's Country Life Blog. She has the most adorable tea party treat recipes and other fun country-style tidbits. Please follow her and show her some love! 

I especially liked this fabulous cake she made for her daughter's birthday !

Just follow these simple rules:

1. Link up something sweet to really WOW us all- your blog, Etsy store, Pinterest, Facebook, whatever you want! 
2. Link-up as much as you want and please follow April's Country Life Blog and me if you are not already. Leave me a comment if you are a new follower so I can follow you back!
3. Hop around and say hi. 
4. Share my button to get more people to join us (not required, but it would be nice!)

 
Photobucket
<a href="http://jessica-healthymommyhealthybaby.blogspot.com/" target="_blank"><img src="<


Photobucket" target="_blank">Photobucket

Wednesday, September 19, 2012

Whole Wheat Mango-Honey Pancakes

I made these the other day when Paul requested pancakes, and they came out so good I couldn't wait to post! Lily gobbled them up, too. These are perfect for the whole family!


Whole Wheat Mango-Honey Pancakes
(makes 6 large pancakes or 12 small, depending on thickness)

1 1/2 cups whole wheat flour
3 1/2 tsp baking powder
1 tsp salt
1 tbsp honey
1 1/4 cup milk of your choice
1 large egg
3 tbsp melted butter or coconut oil + 1 tbsp extra
1 mango, diced
Extra honey and/or maple syrup for topping

Combine all dry ingredients together in one bowl, then all the wet (except for mango) in another. Next, combine together in one big bowl.  Heat butter or coconut oil over medium-low heat in large pan. Spoon pancake mixture onto pan to form a circle shape to your desired size. Place a few hunks of the mango onto pancake batter in pan, and drizzle extra honey over it if desired, like in the picture below.


Heat for about 5 minutes, or until the batter starts to bubble, and then flip over and heat for 3-5 minutes longer on other side. Serve with mango and syrup and/or honey on top. 


YUM!!!

These were so good! I was super pleased, and so was Lily who gobbled a whole coaster-sized one up with extra mango. Lily loves mango! What kid doesn't? It's always been one of her favorite fruits, ever since she was a babe. It is also very good for her, in that it provides high amounts of vitamin C, vitamin A, fiber, calcium and so much more!

If you are better at being creative than I am, you can make cute shapes and faces with the mango pieces in the pancakes as you fry them. I think I'll try to make a Mickey Mouse-shaped one for Lily next time :)


Sunday, September 16, 2012

Meatless Monday: Grilled Carrots and Yukons

Summer is coming to an end, but with the weather still warm, last week Paul and I decided to get some grilling done before it's completely gone. I tried something new and grilled organic carrots and Yukon Gold potatoes with some unique marinades. Take a look...


To prepare vegetables:

Cut ends off of each carrot (I used 8) and shave. Thoroughly wash potatoes (I used 2 large ones) and cut into quarters. Peel if desired. 

Rosemary-Balsamic Marinade

2 tbsp olive oil oil
2 tbsp balsamic vinegar
1 tbsp rosemary (fresh or dried)

Mix all ingredients together in small bowl. Brush over vegetables with basting brush. Add extra rosemary if desired.

Curried-Maple Marinade

2 tbsp butter
2 tbsp curry powder
1 tbsp maple syrup

Melt butter (or you could use coconut oil instead) over low heat in small pan. Stir in curry to make it curry butter. Remove from heat and mix together with maple syrup in small bowl. Brush onto vegetables with basting brush. 

To grill:

Allow vegetables to marinate for at least one hour before grilling. Heat grill to 350 degrees, then place vegetables directly onto grill, or wrapped in tin foil if preferred. Heat carrots for 10 minutes on each side or until cooked through; heat potatoes 15-20 minutes on each side or until cooked through. Pierce with fork to test done-ness. Marinate once more halfway through cooking. Allow to cool before serving.

They were simply delicious! I loved how both of the marinades turned out, but if I had to choose, I'd have to say the carrots were best with the Rosemary-Balsamic and the potatoes were best with the Curried-Maple. Just delish! Paul, Lily, and I ate them all up! The carrots went the fastest, though...

This is an ideal way to serve veggies for the whole family. Each marinade is sweet and slightly spicy without going overboard, and with low calories and only natural, healthy sugars. I hope you enjoy! Serve babies over 6 months fresh veggies grilled without marinade and mashed with a fork. My niece loves them that way!

Now it's your turn to share your Meatless Monday dish below! No rules, other than please only link-up meat-free recipes. No other un-related links or I will remove them. Sorry to sound so harsh, but let's keep it true to what it is, ok? Link up as much as you want, and feel free to spread the word with the button below. Thanks, and have a great week! 

Photobucket

Friday, September 14, 2012

Sweet Saturday #20: Quinoa Smoothie

I got this idea for a protein-packed, super thick smoothie from the aptly-named, Green Thickies blog. I had heard about it being possible to make a smoothie using cooked quinoa, but after Katherine Natalia linked up her version onto Meatless Monday earlier this week, I decided it was high time I tried it!

I happened to have some recently purchased quinoa in my cupboard, along with other things that could easily be used to make a good-tasting and super healthy smoothie. No green stuff left (I had just made a big batch of kale pesto!), so this was all fruit, protein and omegas! The quinoa gave it a slightly nutty taste, but other than that, it tasted just fine!


Banana-Mango Quinoa Smoothie

1 cup cooked quinoa
1 banana
1 mango
1 cup coconut-almond milk, or milk or your choice
1 tbsp honey
1 tbsp shelled hemp seeds
Ice cubes (optional)

Cook the quinoa ahead of time according to package instructions; it is just like cooking rice. Toss all ingredients into blender and hit "Blend" or "Puree", depending on how smooth you want it. Pureeing will make it less "chunky", as the quinoa will create some minor lumps in the smoothie. I kind of liked that! Serve with ice is desired.


The smoothie came out so thick that the ice cubes rested right on top of it! I thought this helped to make it easier to drink, but if you like it extra thick, then this is the recipe for you! You can even blend the ice cubes right into it.

Other ingredients you can add:
  • vanilla extract
  • ground flax seed (this will give it an extra nutty taste)
  • soaked raw almonds and/or cashews
  • peanut butter (or other nut butter)
  • pineapple
  • peach
  • melon
  • spinach
  • just about anything that goes well in a smoothie!

Quinoa is considered a super food, and contains such a high amount of protein, it is called a "complete protein" since it contains all the amino acids needed to meet our nutritional needs. It is also high in other important nutrients, such as iron, calcium, copper, and manganese, to name a few. It is gluten-free and incredibly versatile to cook with, making it a great addition to soups, salads, breads, and even cookies!

This is a great smoothie for the whole family, perfect for enjoying with breakfast. It can easily replace your coffee with the amount of healthy carbs it contains to jump-start your day. Simply add whatever fruit you and your family enjoy most to make it work for you.

OK- now it's time for the hop! No guest-hostess today- sorry! I just didn't have time to organize that aspect this week. Just follow these simple rules:

1. Link up something sweet to really WOW us all- your blog, Etsy store, Pinterest, Facebook, whatever you want! 
2. Link-up as much as you want and please follow me if you are not already. Leave me a comment if you are a new follower so I can follow you back!
3. Hop around and say hi. 
4. Share my button to get more people to join us (not required, but it would be nice!)

Healthy Mommy, Healthy Baby

Thanks so much for linking up, I really do love Fridays even more because of this :)

Wednesday, September 12, 2012

Pork-free Andouille Sausage and Cauliflower Skillet + Aidells Sausage Review

I had a head of cauliflower and wanted something to do with it. Something new, yet simple too. I came across this easy recipe that looked like it would hit the spot, and it sure did. But, I wanted to beef it up a bit, and then I remembered the pack of Chef Bruce Aidells® Cajun Style Andouille sausage I had just bought. The combination came out even better than expected...


Andouille Sausage and Cauliflower Skillet
(serves 4-6)

Ingredients:

1 head of cauliflower, chopped into florets
3-4 cloves garlic, minced
2 tablespoons of olive oil
1 small bunch of chives, chopped

1/2 tsp sea salt
Juice and zest of one lemon

1 12 oz package Chef Bruce Aidells® Cajun Style Andouille sausage (or something similar)
Salt and pepper to taste

Heat the olive oil and sea salt in a skillet over medium-low heat. Stir in the cauliflower and fry until partially browned, like in the pic below. Flip florets around as needed. Add the garlic and sausage and cook for another 3-5 minutes, stirring occasionally. Stir in the garlic in the last 30 seconds then remove from heat. Stir in the lemon juice, zest, and chives, then serve.

The delicate flavors of the cauliflower with lemon combined with the spicy sausage is an interesting balance. It tasted even better as leftovers for breakfast the next day, which I served with 2 fried eggs and some extra chives on top. 

Paul liked this one, too, and Lily liked the cauliflower, although the sausage was too hot and spicy for her. Beware of that fact if you are serving this to little ones who are sensitive to spicy foods! You can substitute with a less spicy sausage then, or omit completely for a more overall family-friendly meal. Paul just suggested using hot dogs instead...you know I wouldn't recommend that, but to each their own! There are other flavor options from Aidells brand, or you could use something else entirely.

The cauliflower on it's own is fine for babies 6 months and older. Kids should like the cauliflower fine on its own if they don't like the andouille, but if they remain picky, my magic trick is adding some grated Parmesan!

As for this brand of sausage, I was happy with it. I picked it up because there was a sample lady singing its praises at Stop and Shop the other day, so I gave what she was offering a try. The first kind she gave me was a sample of Aidells® Roasted Garlic & Gruyere, which I thought I would love, but something about it didn't quite grab me. I think it was a little too heavy on the gruyere or something...I know- how can that be?!

    
So then she gave me a few other choices and my ears perked up when I heard andouille, since all of Aidells® products are made with poultry, and not pork. I eat andouille on occasion (like when dining out or when I know it's from a humanely raised animal), and I must say it is my favorite sausage. I hadn't found a pork-free version until this day at Stop and Shop. I tried a mini version of the Cajun Style Andouille and liked it enough to buy a pack. The happy sample lady gave me a $1 off coupon and a little booklet with more product info and more coupons. 

I imagined lots of fun ways to use this sausage: serving them up as hors d'oeuvres at a BBQ or other gathering wrapped up with asparagus spears in smoked cheddar cheese, slicing them up with scrambled eggs (which I did and that was good too!), concocting some fun skillet (Which I also did! See pic below). This is a very tasty and versatile sausage- hot and spicy, yes, but I found it to be just the right amount of hotness. It won't send you running for the water after you eat a plateful, but you may need a cold drink after the initial shock of the first bite. 

  
Overall, this is a good product and I recommend it. I also like that on the website it says that Chef Bruce Aidell uses only "humanely raised poultry". I don't know the full extent of that as it doesn't go into details about the farming practices, but I will do some digging. Aidells® does make organic products, too, and the site also says they support non-profits, but there isn't much detail about that either. Take a look at their site for more information. 

Note: I was not paid or asked to write this review, I did it by my own accord. Do you know a great product I should review, or a product you’re curious about but afraid to try? Let me know in the comments! Just please suggest a natural, organic, eco-friendly, or health or food-related product so it will at least coincide with my blog’s theme, thanks! OR you can send me a product you'd like me to review for you, by contacting me at healthymommyhealthybaby@gmail.com for more details.


Monday, September 10, 2012

It's Meatless Monday, but I'm taking a break...

Hello, everyone. I hope you all had a lovely weekend. I had quite a full one, and didn't have time to prepare anything for today's post. SO, I am being forced to share some of the goodies that were linked up here last weekend...oh, fooey... ;)


This delectable Pretzel Toffee from Couponing & Cooking caught my eye immediately! It's also very easy to make, so easy in fact I am definitely going to have to try and make it myself ASAP!


New party-er Earthgiven linked up this amazing Spinach, Rice and Cashew Salad. Not only is it super yummy and super healthy, it is also gluten, sugar, and wheat -free. Plus, easy to make- gotta love that!


This is not the first time I'm featuring Mary's Kitchen here. She always posts such simply delicious and healthy recipes, and these cute little Guacamole Cucumber Bites are no exception.


This lovely Corn Chowder with Zucchini and Orzo looks like the perfect late summer soup. A great combination from Frugal Foodie in WV.


Lastly, I'm sharing these pretty Strawberry Margarita Cupcakes from Supremely Divine Life. Sometimes you just need something a little naughty and a lotta sweet in your life ;)

Thanks to everyone who linked up! Everything is awesome! Thanks for joining every week and making this little recipe hop a success!!! I'll post a yummy new recipe on Wednesday to make up for not having something today. Have a great day!

Now it's your turn to share your Meatless Monday dish below! No rules, other than please only link-up meat-free recipes. No other un-related links or I will remove them. Sorry to sound so harsh, but let's keep it true to what it is, ok? Link up as much as you want, and feel free to spread the word with the button below. Thanks, and have a great week!
 

Photobucket
Related Posts Plugin for WordPress, Blogger...